


Now that you’ve configured your audio device in Studio One Prime, let’s create a new Song. This is the format Studio One uses for any recording session, not just the ones with music. This is the first step you will take when recording your podcast, intro, or bumpers in Studio One.
We’ll start by setting up your default audio I/O.
 From the Start page, select “Create a New Song.”
In the New Song window, name your Song and choose the directory in which you’d like it saved. You’ll notice a list of templates on the left. These templates provide quick setups for a variety of devices and recording situations. The tutorial will describe creating a Song from an empty session.
Select “Empty Song” from the Templates list. At this point, you should give your Song a name and select your preferred sample rate and bit depth for recording and playback. You can also set the length of your podcast (recommended) and the type of time format you would like the timeline to follow (notation bars, seconds, samples, or frames). Since you'll be minding the run-time of your podcast, you'll want to select "seconds" from the pull-down menu. Click the OK button when you are finished.

Power User Tip: If you plan to import loops into your Song, make sure that the Stretch Audio Files to Song Tempo option is selected. This will automatically import loops at the correct tempo.
Configuring Your Audio I/O
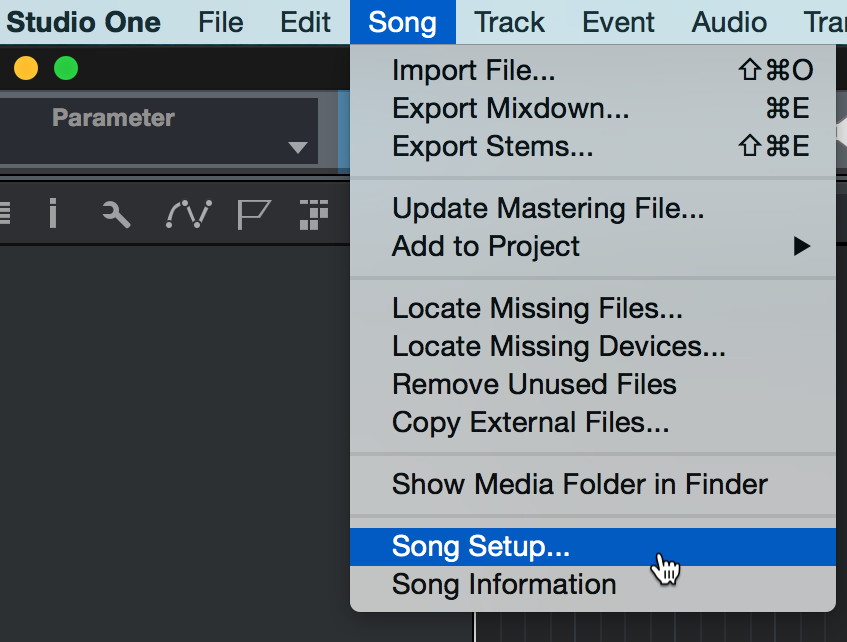 Click on Song | Song Setup to set your sample rate and resolution and configure your audio I/O.
Click on the Audio I/O Setup tab.
From the Inputs tab, you can enable any or all of the inputs on your audio interface that you’d like to have available. We recommend that you create a mono input for each of the inputs on your interface.

Click on the Outputs tabs to enable any or all of the outputs on your audio interface. In the lower right corner, you will see the Audition Select menu. This allows you to choose the output from which you will audition audio files prior to importing them into Studio One Artist. In general, you will want this to be the main output bus.

Power User Tip: If you would like this I/O configuration to be the same every time you open Studio One, click the Make Default button.
Adding Meta Information (optional)
 Studio One Prime gives you the option to tag your podcast with Meta Information that is stored with the file when digitally distributing it. This is a great way to ensure your podcast is properly tagged with consistent information every time. Click on the Meta Information tab in the Song Setup window to add the following information:
- Title. Use this field to add the name of your podcast episode. If you plan on doing this, remember to take this step before you record each episode!
- Artist. That's you!
- Album. Use this field to add the name of your podcast.
- Comment. If you plan on tagging each episode with its own title, use this field to add a brief description of what each podcast episode is about.
- Songwriter, Composer, Arranger. While these fields are very useful for musical artists, they don't really serve a purpose for a podcast and can be left blank.
- Genre. Is your podcast about writing? Working out? Add it here!
- Year. This is great for archival purposes as your podcast continues from year to year.
- Website. Being a savvy podcaster, you already have secured your podcast name as a web domain, right?
- Copyright. Any creative content should be secured with a copyright. Be sure to tell the world who owns the rights to your podcast.
Congratulations! You're reading to start recording your podcast. The next lesson will get you started.