


In the audio world, “latency” is another word for “delay.” It’s the time it takes for the sound from the front-of-house speakers at an outdoor festival to reach you on your picnic blanket, or the time it takes for your finger to strike a piano key, for the key to move the hammer, for the hammer to strike the string, and for the sound to reach your ear.
Your brain is wired so that it doesn’t notice if sounds are delayed 3 to 10 milliseconds. Studies have shown that sound reflections in an acoustic space must be delayed by 20 to 30 ms before your brain will perceive them as separate. However, by around 12 to 15 ms (depending on the listener), you will start to “feel” the effects of a delayed signal. It is this amount of delay that we must battle constantly when recording and monitoring digitally.
Roundtrip latency in digital-audio applications is the amount of time it takes for a signal, such as a singing voice or a face-melting guitar solo, to get from an analog input on an audio interface, through the analog-to-digital converters, into a DAW, back to the interface, and through the digital-to-analog converters to the analog outputs. Any significant amount of latency can negatively impact the performer’s ability to play along to a click track or beat, making it sound like they’re performing in an echoing tunnel.
What’s Producing the Delay?
In practical terms, the amount of roundtrip latency you experience is determined by your audio interface’s A/D and D/A converters, its internal device buffer, its driver buffer, and the buffer setting you have selected in your digital audio workstation software (Mac®) or Control Panel (Windows®).

Converters. Analog-to-digital converters in your interface transform an analog signal from a microphone or instrument into digital bits and bytes. This is a ferociously complex process and takes a little more than half a millisecond on average. On the other end of a long chain we’re about to describe are the digital-to-analog converters that change the digital stream back into electrical impulses you can hear through a monitor speaker or headphones. This can add up to another millisecond or so.
Buffers. A buffer is a region of memory storage used to temporarily hold data while it is being moved from one place to another. There are four of these in the digital signal chain.
- Transport front buffer (USB)
- ASIO / Core Audio (driver) input buffer
- ASIO / Core Audio (driver) output buffer
- Transport back buffer (USB)
Each buffer contributes to the total delay present between the time you play that hot guitar solo and the time you hear it back in your headphones.
You may wonder why Thunderbolt™ was omitted from the transport clock buffer types. Properly designed Thunderbolt drivers employ a Direct Memory Access (DMA) engine that reads digital audio data directly from memory without buffering, greatly improving both efficiency and latency, so they’re in a category of their own. More on that in a minute.
Fast Drivers and Slow Drivers
The biggest variable that contributes to how long this process will take is driver performance. In computing, a driver is a computer program allowing higher-level computer programs to interact with a hardware device. For example, a printer requires a driver to interact with your computer. A driver typically communicates with the device through the computer bus or communications subsystem to which the hardware connects. Drivers are hardware-dependent and operating-system-specific. One of the primary goals for engineers who design audio-interface drivers is to provide the best latency performance without sacrificing system stability.
Imagine that you’re playing an old, run-down piano and that there is a catch in the hammer action—so big a catch, in fact, that when you strike a key, it takes three times longer than normal for the hammer to strike the string. While you may still be able to play your favorite Chopin etude or Professor Longhair solo, the “feel” will be wrong because you’ll have to compensate for the delayed hammer-strikes. You will have a similar problem if the buffer-size setting is too large when you overdub a part while monitoring through your DAW.
Take Two Buffers and Call Us in the Morning
A buffer is designed to buy time for the processor; with the slack the buffer provides, the processor can handle more tasks. When the buffer size is too large, it’s delaying the data (adding latency) more than is necessary for good computer performance. But if the buffer size is too small, the processor has to work faster to keep up, making it more vulnerable to overload, so your computer-recording environment becomes less stable.
Consider this scenario: You’re playing your favorite virtual instrument, trying to add one more pad part to a nearly finished song. All 62 tracks are playing back, and all of them use plug-ins. Then it happens: Your audio starts to distort, or you start hearing pops and clicks, or worse, your DAW crashes because your CPU is overloaded. The 64-sample buffer size you have set, in conjunction with the amount of processing that your song requires, overtaxes your computer. So the choice is a smaller buffer for less delay but an unhappy CPU or a larger buffer and more stable CPU but more delay. If you increase the buffer size, you can probably stop the software from crashing. But it’s not that simple.
The more you increase the buffer size—for example, up to 128 samples—the more you notice the latency when trying to play that last part. Singing or playing an instrument with the feel you want becomes extremely difficult because you have essentially the same problem as with that rickety piano’s delayed hammer strikes. What you play and what you hear back in your headphones or monitor speakers get further and further apart in time. Latency is in the way. And you’re in that echo-y tunnel again.
 Modern DAW applications like PreSonus® Studio One® have helped solve this problem by providing the capability to “freeze” audio files. When a track is frozen, the plug-ins processing your audio are rendered, while preserving the original plug-in settings. This removes the CPU load of the plug-in processing, while still enabling you to go back and make changes, allowing you to offload the processing that’s driving the need to increase the buffer size.
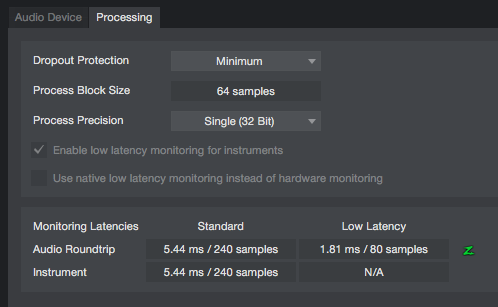 Studio One takes this one step further with the introduction of native low-latency monitoring. When used with a high-speed audio interface, such as the PreSonus Quantum, Studio One’s completely redesigned audio-engine latency management allows you to stay in the native processing domain throughout the entire production process. The result is faster performance and better stability, including flexible dropout protection that reduces the risk of audio dropouts in CPU-heavy songs, even at very small buffer settings.
Native low-latency software monitoring works on virtual instruments, as well, enabling VIs to be played live, typically with unnoticeable latency. This is made possible by separating the processing cycles for audio monitoring, virtual instrument monitoring, and playback. For DSP-equipped interfaces such as the PreSonus Studio 192, you have a choice between low-latency software monitoring and even lower latency hardware monitoring.
Depending on the settings for Device Block Size and Dropout Protection, native low-latency monitoring can be achieved even with complex songs using many plug-ins and virtual instruments. Higher Dropout Protection settings result in a larger block-size for playback, while smaller Device Block Size settings result in lower audio and virtual instrument monitoring latency.
Decoding Latency
Let’s look at our piano example again, this time with a fully functioning baby grand and not that antique piano in desperate need of repair. For simplicity’s sake, let’s pretend that there is no mechanical delay between when your finger strikes the key and the instant the hammer strikes the string. Sound travels 340 meters/second. This means that if you’re sitting one meter from the hammer, the sound will not reach your ears for a little more than 3 ms. So why does 3 ms not bother you a bit when you’re playing your grand piano but a buffer setting of 2.9 ms (128 samples at 44.1 kHz) in your DAW make it virtually impossible for you to monitor your guitar through your favorite guitar amp modeling plug-in?
As mentioned earlier, roundtrip latency is the amount of time it takes for a signal (such as a guitar solo) to get from the analog input on an audio interface, through the A/D converters, into a DAW, back to the interface, and through the D/A converters to the analog outputs. But you can only control one of part of this chain: the input latency—that is, the time it takes for an input signal such as your guitar solo to make it to your DAW.
This is where driver performance enters the picture. There are two layers to any isochronous driver (used for USB interfaces, for example; Thunderbolt is different in this aspect as well). The second layer provides the buffer to Core Audio and ASIO applications like Studio One and other DAWs. This is the layer over which you have control.
However, you usually are not given this buffer-size setting as a time-based number (e.g., 2.9 ms); rather, you get a list of sample-based numbers (say, 128 samples) from which to choose. This makes delay conversion more complicated. And most musicians would rather memorize the lyrics to every Rush song than remember that 512 samples equate to approximately 11 to 12 ms at 44.1 kHz. (To calculate milliseconds from samples, simply divide the number of samples by the sample rate. For example, 512 samples/44.1 kHz = 11.7 ms.)
The buffer size that you set in your DAW (Mac) or in your device’s Control Panel (Windows) determines both the input and the output buffer. If you set the buffer size to 128 samples, the input buffer and the output buffer will each be 128 samples. At best, then, the latency is twice the amount you set. However, the best case isn’t always possible due to the way audio data is transferred by the driver.
For example, if you set your ASIO buffer size to 128 samples, the output latency could be as high as 256 samples. In that case, the two buffers combine to make the roundtrip latency 384 samples. This means that the 2.9 ms of latency you set for your 44.1 kHz recording has become 8.7 ms.
Add in the latency for the analog-to-digital and digital-to-analog converters, as well as their buffers, and our 128-sample example setting easily exceeds the 10 ms threshold. But even 10 ms is right at the cusp of human perception and is a delay for which most musicians can compensate, with some effort. However, at this threshold, they will most likely begin to feel the delayed monitoring versus the direct sound from their instrument, and their performance will begin to suffer.
Where Does the Extra Delay Really Come From?
The culprit is that first mysterious audio-driver layer that no one ever discusses. This lowest layer has no relationship to audio samples or sample rate. In the case of USB, it is a timer called the USB bus clock. The USB bus clock is based on a 1 ms timer. At an interval of this timer, an interrupt occurs, triggering the audio processing. The problem that most audio manufacturers face is that without providing control over the lower-layer buffer, users cannot tune the driver to the computer as tightly as they would like. The reason for not exposing this layer is simple: The user could set this buffer too low and crash the driver—a lot.
To get around this, most manufacturers fix this buffer size. Depending on the audio driver, this could be as much as 6 ms input latency and 6 ms output latency. But like the ASIO and Core Audio buffers discussed earlier, even if these buffer sizes are set to the same value, the resulting output latency can differ from the input latency.
For our example, let’s keep things simple and say that latency is 6 ms in both directions. Our mystery is solved: There are 12 ms of roundtrip latency built into the driver before the signal ever reaches your DAW, in addition to the 9.7 ms latency we calculated earlier, so you set 2.9 ms of delay in your DAW and end up with 21.7 ms of real roundtrip latency!
Modern interface designs compensate for all this extra latency several ways. First, by using low-latency converters; second by optimizing the USB bus clock buffer to be fixed as low as possible; and last, by providing even lower-latency onboard monitoring features. For example, the Studio-series USB-C™ interfaces have a measured roundtrip latency as low as 3 ms on some systems.*
*96 kHz, 32 sample buffer in Studio One on an Intel Core i7 3.10 GHz running Windows 10
Solving the Problem

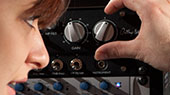
 Many audio-interface manufacturers have solved the problem of monitoring latency through a DAW by providing zero-latency or low-latency monitoring solutions onboard their interfaces. One of the easiest solutions is to simply blend the analog input signal with the playback from the computer. The simple analog Mixer knob on the front panel of the PreSonus AudioBox USB 96, AudioBox iTwo, and Studio 24c allows you to blend the analog (pre-converter) input signal with the stereo playback stream from the computer.

A similar solution is utilized by the AudioBox iOne, Studio 26c, and Studio 68c. These interfaces provide a Direct Monitor switch that sums the analog signal with the playback streams, giving you an equal mix of the two.
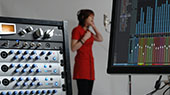
More advanced interfaces, like the Studio 192, provide a powerful onboard DSP with most of the functions one would find on a digital console. Anyone who has recorded using a PreSonus StudioLive® mixer (or anyone who has tracked with any mixer, for that matter) knows how important it is to be able to record a track while hearing effects, as well as compression and equalization. For example, if reverb on a vocal is going to be part of the final mix, it’s almost impossible to record the vocal “dry” because phrasing and timing are totally different when you can’t hear the duration and decay of the reverb.

The Studio 192 provides the same user experience as monitoring through an outboard mixer, without the additional cost, complexity, and cabling that kind of setup entails. These devices are equipped with a powerful onboard DSP that is capable of running 16 instances of the Studio One Fat Channel plug-in, plus reverb, and delay.
Because these plug-ins are running on the DSP onboard the Studio 192, they are only subject to the converter latency discussed earlier. This makes monitoring through these interfaces nearly latency-free (less than 2 ms).
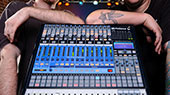
The UC Surface software that comes with the Studio 192 provides control over the Fat Channel plug-ins running inside the interface, which provide a noise gate/expander, compressor, 4-band fully parametric EQ, and limiter for every analog input and eight channels of ADAT inputs.
UC Surface also provides multiple monitor mixes and two effects mixes to add just the right of reverb and delay to create rich monitor mixes. Because UC Surface can also run on an iPad, you can connect your computer and iPad to the same wireless network to easily add a second, remote screen for all your Studio 192 controls wherever you are. This lets you gain stage your preamps at the source and give your musicians more control over their monitor mixes.
Taking it One Step Further
 It would be disingenuous to imply that the Studio 192 is unique in their ability to run multiple instances of a high-quality software plug-in like the Fat Channel. However, the Studio 192 is the first affordable interface to provide total control and ultra-low latency monitoring from within a host DAW.
When a Studio 192 user launches Studio One, preamp controls and controls for the onboard Fat Channel plug-in instances appear within the Studio One console. This enables Studio One users to easily and conveniently create monitor mixes and control their preamp settings without leaving their DAW mixing environment and save their Studio 192 settings with their audio session.
All of these same parameters also are remotely available from Studio One Remote for iPad® and Android™. This allows users to remotely gain stage their preamps, dial in their monitor mix with Fat Channel plugin processing, and start and stop their recording—all wirelessly, using a touch interface.
 Another unique advantage of the Studio 192 interface's integration with Studio One is a sonically seamless transition between playback and monitoring. Because the Studio One Fat Channel plug-in is the same plug-in that runs in the Studio 192 DSP, there is no difference in tone between what the user hears in their monitors and what they hear when audio is played back. This solves the punch-in conundrum that has plagued musicians for decades.
No matter how you set your ASIO/Core Audio buffer size, the monitoring latency on your Studio 192 is not affected, so you can set this buffer fairly high and lower it only when you are playing virtual instruments. If you’re solely tracking through the Studio 192, and not performing with virtual instruments or through amp modeling plug-ins, you can set your computer to the largest available buffer size and start piling on the plug-ins, leaving the low-latency monitoring performance to the Studio 192.
Taking the Quantum Leap

The Intel® Thunderbolt protocol has opened new possibilities in low-latency monitoring. With the PreSonus Quantum-series interfaces and its optimized Thunderbolt 2 drivers for macOS® and Windows, you can monitor from within your DAW, through your favorite plug-ins, with less than 2 ms of roundtrip latency.
How did PreSonus do it? Providing the lowest latency possible was the goal of both the Quantum hardware design and the driver design. Input and output latency were reduced by utilizing high-quality analog-to-digital and digital-to-analog converters with the lowest latency possible, while still achieving 120 dB of dynamic range. This reduces the latency that cannot be controlled by the buffer size from within your DAW.
Quantum’s proprietary driver was written from the ground up to deliver ultra-low-latency performance, while maximizing efficiency. By reducing the roundtrip latency below 1 ms*, you can easily monitor through your DAW, including your favorite plug-ins. This allows you to manage your session and your musicians’ monitor mixes from a single window. Even at higher buffer sizes, Quantum delivers consistent low-latency performance.
*192 kHz, 64 sample buffer in Studio One 3.5 on a MacBook Pro 2016, 2.7 GHz Intel Core i7 running 10.12.5
The Quantum driver utilizes the bus master Direct Memory Access (DMA) to transfer audio data directly to and from the main memory without using CPU processing and the overhead that would come with it. DMA supports 64-bit addressing on systems with 4 GB or more of RAM. A companion DMA engine was also implemented in the Quantum hardware to read digital audio data directly between the ADC/DAC and the computer memory, one sample at a time.
For maximum efficiency, samples are transferred from the Quantum DMA engine directly into driver memory as a 32-bit word to match the way the Quantum driver handles the audio. Where possible, audio samples are also transferred into driver memory in the exact order that the driver expects. This helps to avoid alignment problems and the like, allowing you to run your Quantum drivers at extremely low buffer settings without overtaxing your CPU.
 Another benefit of Intel’s Thunderbolt technology is that it’s designed to connect multiple high-bandwidth devices to your computer. Quantum is equipped with two Thunderbolt 2 ports, allowing you connect other Thunderbolt peripherals (hard drives, monitors, etc.) to your computer. Even better, up to 4 Quantum interfaces can be aggregated on your Mac or Windows computer to create a massive audio I/O system of up to 104 inputs and 128 outputs.
