
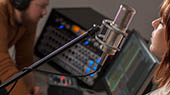


Today’s audio engineers are well-versed in running monitors while running mains. It goes with the territory. Many digital mixers, including the StudioLive Series III, offer tools to put monitor mix controls in the hands of the musicians on stage, but you still need to get the audio to their ears. This can force you to compromise your front-of-house sound to contend with feedback on stage.
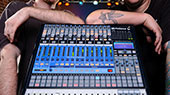
PreSonus StudioLive Series III digital mixers provide advanced digital patching options that allow you to create two distinct mix environments: one for stage and one for Front-of-House. Two mixers in the line are uniquely suited for this application: the StudioLive 64S 64-channel digital console and the StudioLive 32SC 32-channel digital console.
What makes these models ideal for this application is that their onboard I/O and channel fader count is exactly half of their mixing capacity. In other words, the StudioLive 64S is a 64-channel console in a 32-channel frame and the StudioLive 32SC is a 32-channel console in a 16-channel frame. While the analog I/O for both digital mixers can be expanded easily and affordably with the addition of an NSB stage box using an Ethernet cable, both consoles can also function as two mixers in one.
 In this article, we will discuss using a single StudioLive 64S as two 32-channel consoles and the StudioLive 32SC as two 16-channel consoles. In both instances, the first fader layer is reserved for Front-of-House, and the second is reserved for monitors. While all practical instructions are for the StudioLive 64S, the same workflow is applicable to the StudioLive 32SC as well. This is part of the power of the FLEX DSP Engine: Every StudioLive Series III digital mixer shares the same processing and routing options as well as the same workflows.
Before we begin, let’s discuss why processing channels differently for front-of-house and monitors is so important, as well as the compromises that must be made in a typical set-up where a single mixer is performing both functions without the benefit of digital patching.
Let’s take the example of a lead vocal. Out in front-of-house, you want it compressed and sustaining to enhance the vibrato and better carry the vocal over the mix. But compression can rapidly decrease the amount of gain before feedback you get from your floor monitors on stage. The typical solution for this conundrum is to send the vocal channel to the stage pre-processing. This makes it less susceptible to feedback, but now the vocalist must monitor their performance in all its raw glory.
By using digital patching on a StudioLive Series III digital mixer and creating a dedicated layer for stage monitors, you can still create a polished sound for your vocalist, only optimized for maximum gain before feedback. Another benefit is that you can customize onstage effects. By using half of the eight (StudioLive 64S) or four (StudioLive 32SC) FLEX FX buses for front-of-house and the other half for monitors. More on that in a minute.
By default, analog inputs 1-32 on a StudioLive 64S are routed to channels 1-32 as well as channels 33-64 respectively. This means that by default, analog Input 1, for example is routed to Channel 1 and Channel 33. However, the default Input Sources for Channels 33-64 are set to Network. The first step is to simply enable Analog as the Input Source for Channels 33-64.
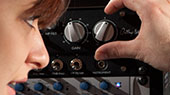
To do so, select Channel 33 on the mixer and select Analog as the Input Source from the Fat Channel.

Repeat this for channels 34-64 and your mixer inputs are now routed as follows:
| Fader Layer 1 | ||||||||||||||||||||||||||||||||
|---|---|---|---|---|---|---|---|---|---|---|---|---|---|---|---|---|---|---|---|---|---|---|---|---|---|---|---|---|---|---|---|---|
| Channel | 1 | 2 | 3 | 4 | 5 | 6 | 7 | 8 | 9 | 10 | 11 | 12 | 13 | 14 | 15 | 16 | 17 | 18 | 19 | 20 | 21 | 22 | 23 | 24 | 25 | 26 | 27 | 28 | 29 | 30 | 31 | 32 |
| Input | 1 | 2 | 3 | 4 | 5 | 6 | 7 | 8 | 9 | 10 | 11 | 12 | 13 | 14 | 15 | 16 | 17 | 18 | 19 | 20 | 21 | 22 | 23 | 24 | 25 | 26 | 27 | 28 | 29 | 30 | 31 | 32 |
| Fader Layer 2 | ||||||||||||||||||||||||||||||||
| Channel | 33 | 34 | 35 | 36 | 37 | 38 | 39 | 40 | 41 | 42 | 43 | 44 | 45 | 46 | 47 | 48 | 49 | 50 | 51 | 52 | 53 | 54 | 55 | 56 | 57 | 58 | 59 | 60 | 61 | 62 | 63 | 64 |
| Input | 1 | 2 | 3 | 4 | 5 | 6 | 7 | 8 | 9 | 10 | 11 | 12 | 13 | 14 | 15 | 16 | 17 | 18 | 19 | 20 | 21 | 22 | 23 | 24 | 25 | 26 | 27 | 28 | 29 | 30 | 31 | 32 |
While you’re making your source patches, you may also want to take the opportunity to color code your monitor layer, so that you can tell at a glance which layer you’re on.
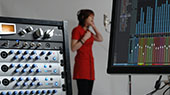
Once your patching is complete, it is recommended that you switch to your front-of-house layer and dial in your main mix. This will make a good place to start your monitor mix. As you create a sound for each channel with which you’re satisfied, copy it to the monitor layer.
For example, after you have sculpted the kick drum on Channel 1 to taste and given it a custom name, press the Copy button in the Fat Channel and paste it to Channel 33.
 In the Advanced Filters, make sure Channel Name is enabled.
Once your front-of-house mix is complete, you can begin to create your monitor mixes as normal, making any processing adjustments you see fit, using only the monitor mix channels (33-64) as the sources for your Aux Mixes or EarMix 16M personal monitor mixers.
Best of all, if you notice a channel is clipping while creating monitor mixes, you can adjust the preamp level right from that layer. Unlike the rest of the Fat Channel Preamp trim and phantom power control is mirrored on both the front-of-house and the monitor layers. The rest of the Fat Channel functions (High Pass Filter, Input Delay, Noise Gate, Compressor, EQ, and Limiter) are all independently available on each layer.
If you would like to create separate effects mixes for front-of-house and monitors, simply designate the first four effect buses and returns to mains and use the second four for monitors.
You now have two independently controlled 32-channel mixers inside a single console, making the best mix possible for your audience and your musicians without any compromises.