


Setting up your audio equipment to maximize the input signal and minimize the inherent noise is arguably the most important step in optimizing its sound quality. PreSonus® has put together this brief tutorial to help you to understand how properly set input levels throughout your signal path, as well as how to avoid some of the most common misunderstandings and pitfalls.
The Ins and Outs of Signal Flow
The first part of understanding how to configure your signal levels is to understand how audio signal functions within an audio system. It should be noted that signal flow is the same whether you are recording into a simple handheld SD recorder or setting up a complex live sound system for broadcast and redundant recording.
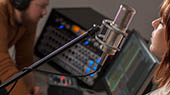
The first step is to understand the components of your system and how they relate to one another. Let’s take a look at a basic signal chain. In the example below, we have a microphone connected to a preamp on a StudioLive AR-series mixer and back out to an AIR10 powered loudspeaker.

In this simple system, there are actually eight gain stages. That is, there are eight points at which the signal passes through an amplifier:
- Microphone Preamp Trim. This is the first and arguably most important gain stage. If you set the signal too low at this first critical stage and increase it later on, you will amplify system noise. Set it too high, and you'll be overdriving your system before you've even gotten started.
- Low-Band EQ Gain. This is the amount you boost or cut the low-frequency band of the channel EQ. Even though this is frequency-dependent, it is still a gain stage. That is why it is generally recommended to cut, rather than boost an EQ frequency.
- Mid-Band EQ Gain. As with the Low-Band Gain, the Mid-Band gain contributes to the overall gain-staging of a signal.
- High-Band EQ Gain. The more bands your EQ has, the more potential gain stages you must account for. Boost them all, and you potentially add up to 15 dB or more to your signal before it hits the mix.
- Channel Output Level. This sets the channel's volume in the mix and generally provides more opportunity to cut than boost—for good reason; more on that later.
- Mixer Output Level. This is the overall output level at which you set your mix.
- Speaker Input Level. This is the level of the input signal that is driving your loudspeaker.
- Speaker Output Level. This the output level of the onboard power amplifier.
It should be noted that our example diagram assumes that you don’t have a compressor, gate, or other processor connected as an insert somewhere. These processors also contain their own gain structures that need to be accommodated. For simplicity's sake, our example also will not consider Pan Law.
With so much potential for gain, even in the simplest of examples, it is critical to examine each stage, from the source all the way to the output.
The goal at each stage of structuring your system gain is to maximize headroom, without clipping, so that the noise floor of each component is exceeded by the signal. As you add more gain stages to a system, this becomes increasingly important.
The first step is to understand the upper and lower boundaries, both of which can negatively impact the quality of the audio at each stage in your audio chain. At the bottom of the signal, you’ll find the noise floor of each component. Every audio component, no matter how high its quality, will have some inherent noise. The level of this noise is produced by the device itself. For analog devices, this level is documented in the signal-to-noise ratio in the audio specification. This ratio determines the level the input signal must exceed to overcome the device’s noise.
Gain Staging 101: Begin at the Beginning
It may seem counterintuitive to boost the signal closest to its source and cut it later in the signal path if it is too loud, but this is precisely the best way to get a noise- and feedback-free recording or show. That said, you don’t want to gain it up too much at the beginning either. If you find that you must cut the signal at every component that sits after the input-trim stage to avoid distortion, you’ve probably set the trim too high. Then, and only then, should you gain it down.
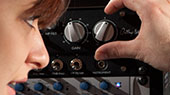
 Step 1: Setting the Trim
Turn the trim knob on your microphone channel clockwise while watching for the signal/clip indicator to turn red, then back it down until the indicator is green only.
How high you have to turn the trim knob depends on several factors: the volume of the source, the sensitivity of the microphone (if the source is miked), the maximum input and gain range of the preamp, and the gain curve of the potentiometer. Let’s take a look at each of these factors in more detail:
- Source volume. This is a bit of a trick, because sometimes you have very little control over how loud the source is set. For guitar amplifiers and keyboards, you may need to tell the musician to turn up or down to get a good signal. For sources that rely on a microphone, this factor depends on the type of microphone you’re using. If you are miking a very loud source (e.g., a kick drum) with a very sensitive microphone (such as a large-diaphragm condenser microphone), you’re going to have to set the input trim much lower than you would when miking the same source with a less sensitive microphone (such as a low-output dynamic microphone). So, why mention it? You should always take the volume of your source into consideration when selecting a microphone and troubleshooting gain staging issues.
- Microphone sensitivity. In general, you must apply more gain to a less sensitive microphone, regardless of the type of source, but consider this: If you are using a microphone that is not very sensitive to pick up a source that is not very loud, and you can’t get enough gain, perhaps you have chosen the wrong tool for the job. Let’s take the common example of a shy vocalist. Not all singers can project very loudly. This is not necessarily a bad thing, but you can’t use the same commonly used dynamic microphone to pick up a shy singer-songwriter who barely sings louder than their acoustic guitar that you would use to pick up the lead singer of a Swedish Death Metal band and expect the same result. While not always possible, changing to a more or less sensitive microphone can solve a plethora of gain staging issues before they've presented themselves.
- Preamp Maximum Input Level and Gain Range. As its name indicates, the maximum input level is the loudest a source can be with the preamp gain set to a specified level (usually unity) without overloading the circuit. But just like source level, this is not an independent variable. How much gain range a preamp provides also factors into how much it can amplify a source. A mic preamp like the PreSonus XMAX, which provides +60 dB of gain, will be able to amplify a signal much more than preamp with a gain range of +40 dB.
- Potentiometer Curve. Depending on the design, a potentiometer can provide most of its gain up front, with very little control, or most of its gain at the end of its throw, giving you slightly more control. In general, the “sweet spot” for most potentiometers is between one and four o’clock. This can be quite a bit further around the clockface than some people expect. And while it should go without saying, the only time you should be mixing with your eyes instead of your ears is when that red clip light comes on—but we’re going to go ahead and say it: Mix with your ears not your eyes.
If you have to turn the trim knob on your mixer or audio interface to five o’clock to get a good signal level, but you’re not hearing noise or distortion, that’s okay. If you only turn the trim knob on your mixer or audio interface to seven o’clock, and you get a good signal level, that’s okay, too. What matters is what you hear, not how perfectly aligned to the midpoint your trim knobs are set. End of lecture.
Step 2: Setting the EQ and Dynamics
After you have set the input gain, you can use your channel EQ to sculpt your source. The more bands your EQ offers, the more control you will have, but you’ll also add more potential for improper gain staging, so use with caution. This is also true if your mixer offers a compressor and other dynamics processing on the channel, as with the StudioLive® Fat Channel, or if you're adding in a dynamics plug-in in your DAW application, like those available in Studio One®.
To set the EQ, you will need to adjust both the channel and the main faders to unity. This is just for the purposes of dialing in the sound you want. You’ll dial in the mix next.
Often, when people are new to using an equalizer, they listen for what is missing from their source signal and try to boost it in. Let’s take a common problem: the kick drum.
You want the kick drum to be big and bassy, so you cut all the highs and mids and boost up the low bands as much as possible, right?
Maybe not. Sometimes, it’s what you remove that filters out the frequencies that are overwhelming the sound that you want to hear.

Let’s take a look at our kick drum again. If you cut all the high frequencies, your kick drum won’t punch through the mix, because the frequency at which its attack resonates will be gone. So, try boosting your high EQ in the 2-5 kHz range, until you find the attack frequency of your kick drum. Cutting your kick drum EQ around 400 Hz will reduce muddiness. Cutting below 80 Hz will reduce boominess. And a slight boost at around 100 Hz will give you that big bottom end you were looking for to begin with.
More information on instrument and EQ frequency ranges can be found in the PreSonus EQ Frequency Guides.
Dynamics processors can be difficult to work with at first because they both reduce gain and amplify it. Let’s take a look at a compressor for a moment. A compressor works by lowering the dynamic range — and by extension, the gain — of a signal, but it also gives you a make-up gain control that allows you to get some of that back. If you apply a lot of gain reduction to a signal, then boost it too far with the make-up gain, you are essentially amplifying a laser, and it can get very unwieldy very fast, especially if you have done the same thing across multiple channels. As with an EQ, only compress a signal as much as you need to, unless you’re using it for an effect, and only gain it back up as far as you have to for it cut through the mix.
More information on compressors can be found in the PreSonus Brief Tutorial on Dynamics Processing.
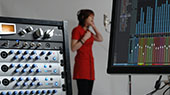
Step 3: Setting Your Mix
Once you have gone through each channel on your mixer and properly set the trim, EQ, and dynamics, then you can dial in your mix with your faders.
 THE UNITY MYTH
There is an unfortunate rumor that exists in the dark reaches of the audio Internet that all your faders should be set to unity, and you should be essentially mixing on your trim knobs. But if you do this, you will limit the dynamic range of your instruments—and not in a good way.
That big ‘U’ next to your faders means just one thing: The channel and output mix level controls are not adding or removing any amplitude to or from your signal.
Why do you need to know this? For input gain staging and dialing in your EQ and dynamics!
With the channel and the main faders at unity, you can listen to an individual channel unadulterated while you’re setting your input gain level and adjusting your EQ and dynamics to sculpt the sound. Once that’s done, that ‘U’ mark has largely served its purpose. Are you getting too much bleed from the kick drum on stage and need to lower the kick microphone’s channel by 30 dB? By all means, go ahead. Need to give the guitarist’s channel a little gas while she’s playing a solo? That’s what that 10 dB above Unity is for.
Like everything in audio, however, these rules aren’t absolute, especially in a live sound situation. If you are gaining up a channel well above unity just for it to be heard in your mix, maybe your other channels are too loud. Try lowering the levels of the rest of your mix.
Step 4: Mains
Adjusting the level between your Main output and your speakers can take a little work to find the right balance. As a rule of thumb, set your Main output level fader so that the Main Output meters on your mixer are consistently below the red 0 dB light. If this light is coming on, especially on a digital mixer, you are overloading the circuit and/or the converters and are going to hear distortion.
Once you’ve set your Main output level, adjust the level of your speakers’ amplifiers (onboard or outboard). In the case of powered loudspeakers like the PreSonus AIR series, you will need to set an input and an output level. As with your mixer, set the input level first, so that you have a good level without distortion, and then set your output level until your speakers are loud enough but are not overdriven.
If you can’t set the input level of your speakers low or high enough, you will need to adjust the output level of your mixer. If you can’t set the output of your speakers high enough without overdriving them, you may need more loudspeakers to fill your room.
More information on selecting and configuring loudspeakers can be found in the PreSonus Brief Tutorial on Loudspeakers.
